Introduction
Currently, there are many platforms for online video content streaming, such as YouTube, Twitch, and others. They use the RTMP protocol (Real-Time Messaging Protocol) to broadcast streaming video over the Internet. While these platforms have powerful video streaming capabilities, in some cases independence from the streaming platform and its rules makes perfect sense.
In this article, I will provide instructions on the deployment of the RTMP service based on Nginx-RTMP, which will allow receiving an RTMP stream from the streamer’s computer, and converting it to modern HLS and DASH formats for viewing in the receiver program.
Prerequisites
To deploy the RTMP service, you need to have:
- A clean virtual machine or physical server based on the Linux OS.
- A computer for streaming.
To work outside the local network, in the global Internet:
- Dedicated IP address.
- Domain.
The instructions will use a VPS based on Debian 11.
Working with Nginx-RTMP
Installation
First of all, you need to install nginx and libnginx-mod-rtmp packages. To do this, you need to execute the following commands:
|
|
Set up RTMP service
Once installed, you need to configure the Nginx web server to listen on port 1935 to receive the RTMP stream. To do this, you need to edit the file /etc/nginx/nginx.conf:
sudo nano /etc/nginx/nginx.confAt the end of the file, you need to add the configuration of the RTMP server:
|
|
An explanation of the important aspects of this configuration:
listen 1935- specifies the port on which the RTMP server is running.chunk_size 4096- sets the block size, 4 KB each.allow publish [IP / Subnet]- each line specifies an IP or subnet that is allowed to send the RTMP stream to the server.deny publish all- prohibits receiving RTMP stream from all other addresses/networks.application live- configuration for converting RTMP to HLS and DASH formats, wherehls_pathanddash_pathindicate paths to directories for placing playlists.live on- allows you to receive data via a video stream.record off- disables recording of the video stream to a file on the disk.
Set up streaming HLS, DASH
Next, you need to deploy a virtual host that will allow access to HLS or DASH streams via the HTTP/HTTPS protocol.
First, you need to create two directories for storing video stream fragments for HLS and DASH:
|
|
And also establish the owner and rights:
|
|
For the virtual host to work, you need to create a new configuration file (for example rtmp) in the /etc/nginx/sites-available directory:
sudo nano /etc/nginx/sites-available/rtmpThe rtmp host file consists of the following:
|
|
Explanation for this configuration:
- Replace
rtmp.yourdomain.comwith your domain. - If you want to use SSL, also write the certificate and key files under the paths
/etc/ssl/yourdomain.crtand/etc/ssl/yourdomain.key. - If you don’t want to use SSL, remove the lines starting with
sslandlisten 443 sslfrom the file.
In order for all the configurations to take effect, you need to enable the virtual host and restart Nginx:
|
|
Broadcasting in OBS Studio
The best suited program for broadcasting is OBS Studio.
First of all, it is necessary to create a scene, adjust the sound, and the appearance of the broadcast.
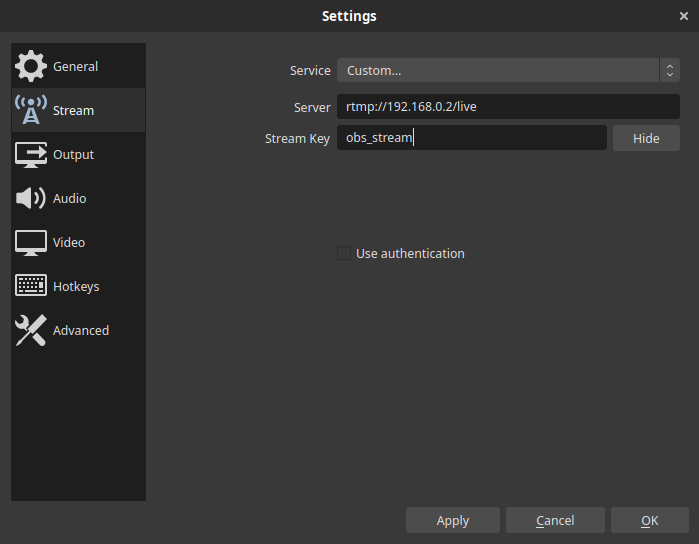
To configure streaming parameters, you need to go to Settings and select the Stream tab. The following parameters must be set there:
- Service: Custom
- Server: rtmp://rtmp.yourdomain.com/live (instead of domain, you can specify IP, for example http://11.22.33.44/live)
- Stream Key: obs_stream
Example settings:
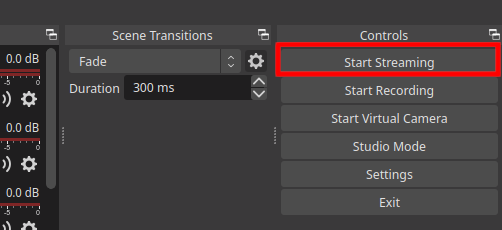
To start a video broadcast, you need to click Start Streaming in the main window of the program:
Viewing the broadcast
The broadcast can now be viewed using any application that supports the HLS and DASH protocols. The easiest way would be to watch in VLC by opening the link to the stream.
To begin with, let’s understand how a link to streams is formed in the configured service:
- HLS:
{protocol}://{domain}/hls/{stream key}.m3u8 - DASH:
{protocol}://{domain}/dash/{stream key}.mpd
For example, if you deployed a service at the address rtmp.yourdomain.com that uses SSL, and in the OBS settings you specified the obs_stream key, then in this case the links will be as follows:
|
|
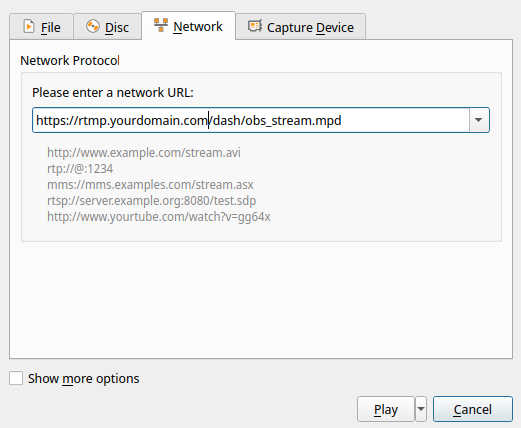
To view in VLC, you need to press Ctrl + N, or go to the menu Media > Open Network Stream, specify a link to one of the formats, and press Play.
Conclusions
In this way, you can create your own broadcasting service, which will be independent of popular services.
Advantages of such a solution:
- Privacy and full control over the infrastructure, guarantee that the flow data is not stored.
- You do not need to follow the rules of the service (for example, a ban on broadcasting certain content).
But there are certain disadvantages:
- Such a solution requires certain server resources.
- The owner needs to spend time and money on maintaining and maintaining the security of his infrastructure.